11. June 2020
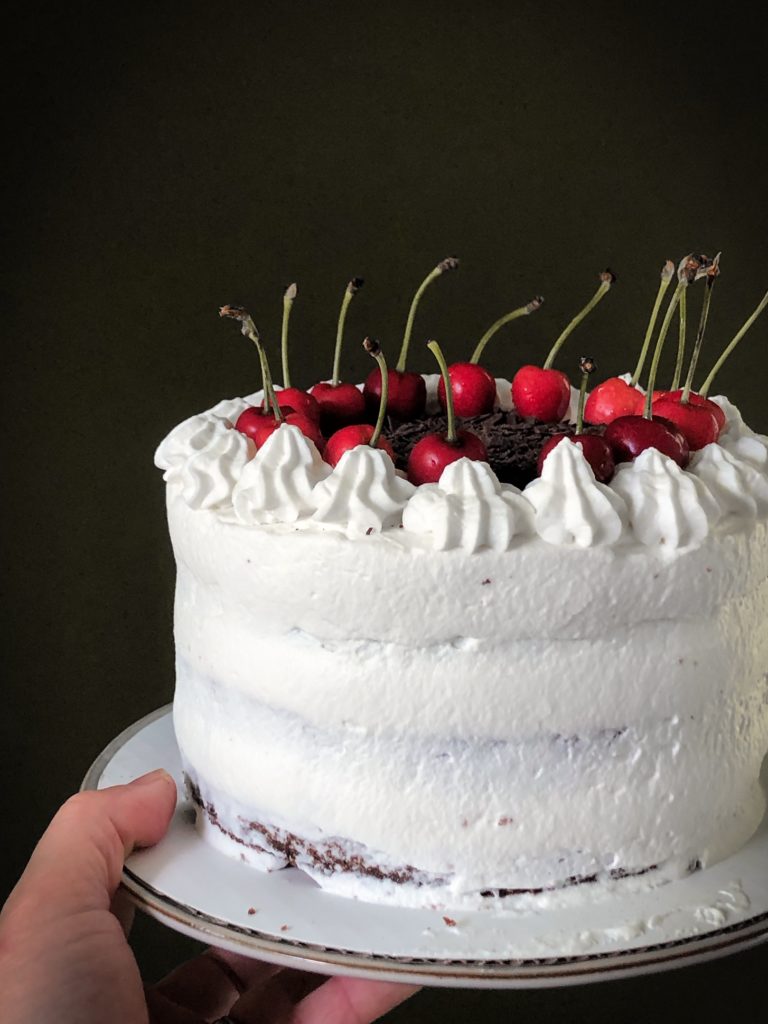
as we all know, black forest cake is t h e classic German pastry, and, as German bakers insist, there is only one correct way of making it: a chocolate sponge base soaked in a high percentage alcoholic beverage called kirsch, filled with tons of sweetened whipping cream and cherries, and topped off with more cherries and dark chocolate sprinkles. according to lore, the gateau as it is also called, derived it’s distinctive features from the festive hats that go along with the traditional costumes women in the Black Forest communities are wearing on holidays and for special occasions.
while origins of this popular German dessert remain fairly unknown, the pastry was regulated by the German government in 2014, setting rules for what qualifies as a truly black forest gateau. according to those regulations only such pastry can be labeled and sold as Black Forest Cake that contains kirsch distilled in the Black Forest region of Germany, is filled and decorated with heavy 30 % fat whipping cream , and has 3 % cocoa added to the base.
luckily, these rules do not apply to home bakers and we are left with tons of black forest cake variations and recipe we are allowed to bake and to eat in the privacy of our homes. i tried a lot of different ones, found some to be too sweet, to heavily soaked in alcohol, to dry at the base and too bland in taste. to me, the best version of a black forest cake is the one from fresh cherries with the refined taste of the juicy fruit taking the lead. also, the base needs some ground almonds for a little texture to balance out the airy volume of the whipped cream. lastly, the extra bit of dark chocolate that pairs so well with the cherries should absolutely be shaved off a high quality chocolate bar, and never come from a jar of sprinkles.
the heavy personality of this very German of all German desserts lends itself to limited consumption. for this very reason, i usually bake it as a mini cake in a 7 inch pan. that way, it’s so much easier to handle when filling and decorating it, and it just looks so much more pretty too!
notes:
this recipe is for a 6 inch cake pan or spring form. double all ingredients for a 9 inch pan. line cake pan or spring form with parchment paper for baking. do not use grease or non-sick spray as it will ruin the dough.
when baking, put the rack into the center of the oven. the cake base is done when a wooden stick comes out mostly clear with only some crumbs, the crust is slightly cracked, and of a medium brown color. let the base cool down on a rack before taking it out of the pan or spring form. peel off parchment paper.
bake the cake base a day ahead, let it cool entirely, and put it in a container with a lid or wrap it in plastic to keep it from drying out.
typically, the classic Black Forest Cake base is soaked in kirsch, a high percentage spirit distilled from cherries. however, feel free to skip the alcohol and use cherry juice or any other red juice to sprinkle over the base.
use fresh, frozen or preserved cherries to fill and decorate the cake. either will create a distinct texture in the filling and have a slightly different taste. Adjust the recipe’s directions for liquid and preparation of the filling accordingly. when using preserved or frozen cherries, preserve any juice or liquid in the jar or from defrosting. when using fresh cherries, remove pits and add 2 -3 tablespoons of water when preparing the filling.
Only use heavy whipping cream from the refrigerator aisle for filling and decorating the cake. for superior taste, the use of cream from spray cans is not recommended. grate or shave a good quality dark chocolate bar, not baker’s chocolate, to sprinkle the cake. I found that using a vegetable peeler works best to shave off the chocolate fast enough before it melts in your hands.
chill Black Forest Cake for at least one hour, or over night before serving to let the filling melt into the cake base. keep any leftovers in the refrigerator, slightly covered in plastic up to two more days. it is possible to freeze the cake. place it in a freezer safe food container covered with a lid. defrost it overnight in the refrigerator or 2 hours at room temperature before serving. do not defrost it in the microwave or the oven.
recipe for my version of black forest cake:
ingredients for the base:
3 eggs, separated
2 tablespoon warm water
100 g sugar
50 g all-purpose flour
25 g cocoa powder
15 g corn or potato starch
50 g almond meal
1/8 teaspoon salt
½ teaspoon baking powder
ingredients for the filling:
about 200 g of preserved (half a jar), frozen or fresh cherries, drained (preserve the juice)
½ tablespoon cornstarch
2 – 4 tablespoons of juice or water
400 g whipping cream
1 ½ tablespoon powdered sugar
50 g dark/bittersweet chocolate bar, chilled in freezer for grating/shaving
directions:
preheat oven to 350°f. line cake pan or spring form with parchment paper.
place the egg whites in a bowl of a stand mixer or a bowl to use a hand held mixer. with the whisk attachment, beat egg whites at medium speed until peaks start to form. slowly add half of the sugar (50g) and continue to beat at high speed until sugar is well incorporated and the egg whites are thick and glossy.
in a separate bowl, beat egg yolks with water and other half of sugar into a light cream. pour egg whites onto egg yolk cream.
in another bowl mix all flour, baking powder, cornstarch, and coco powder. using a sifter, add the dry ingredients to the egg mixture, then add the almond meal. with a rubber spatula or a wooden spoon, carefully fold everything together until batter is thick and creamy. do not over mix to avoid pushing the air out of the egg whites. fill the batter into cake pan, bake for about 30 – 35 minutes until a wooden pick comes out clean. let cake base cool down on a cooling rack.
to prepare the filling, set aside about ten cherries for decorating the cake. use the rest of the cherries for the filling. in a sauce pan, mix cherries with water and cornstarch. bring the mixture to a boil until cherries just are starting to break apart and the liquid starts to bubble up and thickens slightly. if liquid is not thickening, dissolve some more cornstarch in cold water and add it to the cherry mix. take pot off the heat and let mixture cool down entirely.
whip the heavy cream with the whisk attachment of a hand held mixture or a stand mixer. as the cream starts to thicken, add the sugar and keep whisking until stiff peaks form. chill in refrigerator.
cut the fully cooled cake base into three layers. soak each layer with one teaspoon of kirsch or some red juice. on a wooden board or a spinning cake stand, set up the cake for filling and decoration. starting with the bottom layer, spread whipped cream about ¼ inch, add half of the cooled cherry filling, place the second layer on top. repeat filling the second layer, top with third layer. for a flat top, turn slightly curved top layer upside down. fill any gaps on the side of the cake with cream.
to finish, layer top and side of cake with cream, smoothing and straightening it with a knife or a spatula. decorate the top with the cherries you set aside earlier, sprinkle with grated chocolate.
for a more refined look, you may want to use a pastry bag to pipe any kind of rosettes from whipping cream onto the cake or to create a ribbons on the sides of the cake.
enjoy!
nikki+++
30. April 2020 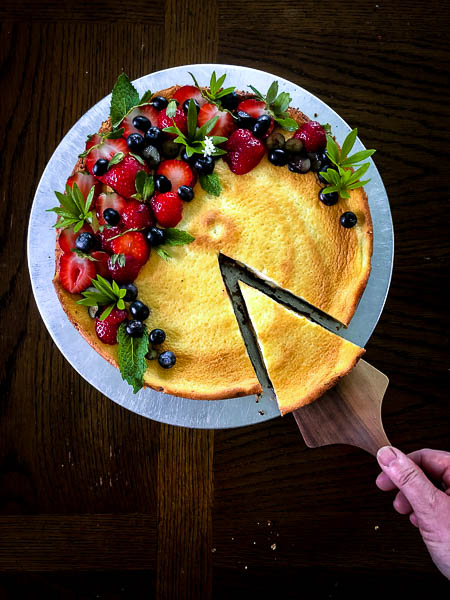
I believe, seasonal baking is the most delicious, and rarely is a pie more seasonal than when made with rhubarb. in fact, there is only a very short window from mid-April to mid-May when the ruby red stems can be found at farmers markets or the produce section of your local grocery store. after I moved stateside, the rhubarb season became even more special, being not only tied to the growing and harvesting season of the plant, but also by its scare availability. every year, my phone starts humming with text messages from like minded friends sharing the few and very secret shopping locations the red gold has been spotted at. yesterday, on one of my outings to the store that have become so rare during these odd times of keeping a distance, I was lucky to find the lovely stems. admittedly, in this very moment I turned into quite the selfish kind, and without much hesitation, I bagged almost all the rhubarb that sat on the top shelf of the produce aisle. later that day, I used some of my equally valuable flour stock, bedded some of the rose colored bounty on a short cake crust and covered it with a sour cream and egg custard I had long forgotten about. to be honest, I like this version of a German rhubarb pie the most, the heavenly mix of chewy crust and tart rhubarb, supported by the mild sweetness of added strawberry preserve, and all of this fruity goodness wrapped in a soft, creamy, elegant layer of custard. seasonal German baking at its best!
recipe for my favorite version of rhubarb pie
ingredients for crust to fill a 9 inch spring form:
200 g flour
130 g chilled butter, in cubes,
70 g fine cane sugar
pinch of salt
2 egg yolks or 1 egg
fruit topping:
300 g rhubarb, skinned and cut 1/2 inch pieces
1 tbsp flour
1/4 tsp ground cinnamon
100 g red berry preserve
a handful of breadcrumbs
custard
3 eggs, separated
70 g fine cane sugar
125 g sour cream
preheat oven to 350°F / 180°C. butter & flour the spring pan.
in a large bowl, mix flour, salt, and sugar. add butter in cubes. with your fingertips, quickly work butter into dry ingredients until small crumbs form. with a wooden spoon, work in egg yolks or egg until smooth dough forms. finish with a few quick turns by hand. spread dough into the spring pan, forming a rim on the edge of about 1 inch high. sprinkle the bread crumbs onto the dough, spread the fruit preserve, top with the cubed rhubarb and bake for 20 minutes.
while the pie is baking, prepare custard. with a stand mixer or a handheld mixer, whip the egg whites until soft peaks form. slowly add the sugar and keep whipping until egg whites are stiff and shiny. in a separate bowl, mix egg yolks with sour cream, stirring by hand. fold egg yolk-cream-mixture under egg whites. top and cover pre-baked pie with egg-sour cream mixture and bake for another 20 minutes until custard turns golden at the edges.
let cake cool down on a cooling rack, carefully remove spring form ring by inserting a knife around the edge first. tastes best on the day of baking. in case there are leftovers, chill in fridge uncovered and eat within the next two days.
nikki+++
24. March 2020 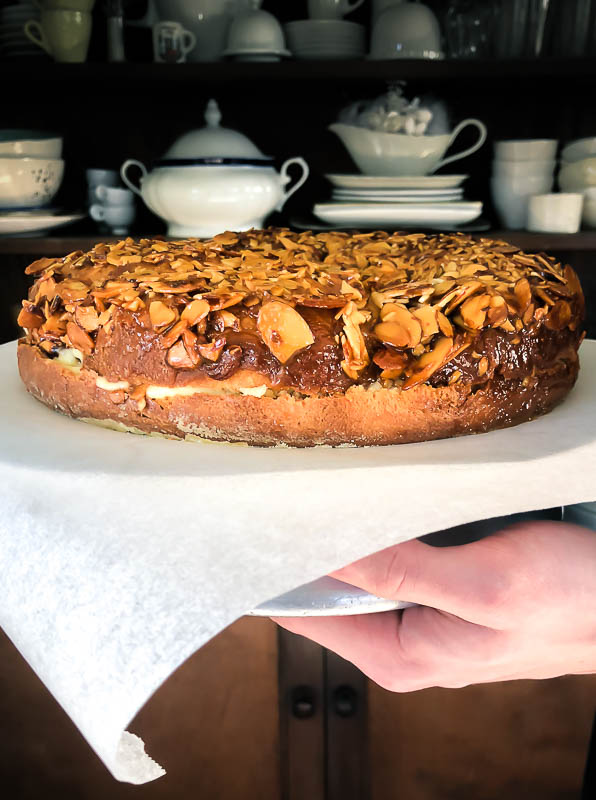
bienenstich translates into bee sting cake and i am not certain that the translation makes any sense in English at all. however, in my German mind, the name “bienenstich” actually fits this classic German pastry in a very meaningful way: bees and particularly wasps love it! speaking for myself however, i always felt quite ambivalent about it. typically baked in squares, the two layers of yeast dough filled with a sweet custard cream are topped with a deliciously crunchy layer of almonds and honey. not surprising, that i remember as a child observing the busy insects wiggle their way into the glass displays of our local pastry shop to get a taste of it. for that very reason, i found the cake particularly unattractive, especially when watching others trying to enjoy it while constantly swatting away some of the flying critters that were landing on their forks. also, i never liked the bland and overly sweet tasting filling from vanilla pudding and whipped cream very much. plus, the topping lacked the extra crunch it promised. for years, i avoided bee sting cake at any coffee table or bakery, and it never crossed my mind to actually make it myself. only after i started teaching the baking classes and when participants made suggestions for pastry recipes they were interested in, did it occur to me that this might be worth exploring. find the result below.
recipe for bee sting cake aka bienenstich
ingredients for the dough:
500 g all-purpose flour or whole wheat pastry flour
1 package active dry yeast
80 g sugar
250 ml milk, warmed
4 egg yolks
½ tsp salt
125 g butter, melted
ingredients for the topping:
100 g butter
100 g brown cane sugar
100 g honey
6 tbsp heavy cream
pinch of salt
200 g sliced almonds
ingredients for the vanilla custard cream:
500 ml whole milk
scrape out vanilla pod or use 1 tsp vanilla extract
5 egg yolks
100 g granulated brown sugar
4 tbsp cornstarch
4 pinches of salt
60 g butter
prepare the dough: warm milk with one tablespoon of sugar in a saucepan or in the microwave. stir in yeast and let sit until mixtures starts to bubble. use the paddle attachment of the stand mixer: combine flour, melted butter, rest of the sugar, 4 egg yolks and milk – yeast mixture. mix at medium speed until a soft dough forms into a ball and comes off the wall of the mixing bowl. set into an oiled bowl, cover with plastic wrap and leave in a warm spot until dough starts puffing up for about one hour.
preheat oven to 350°F. butter and flour rectangular baking pan ca. 9×13 inches or 9 inch spring form. roll out dough to the size and shape of your baking dish, use fingertips to stretch towards the edges. cover with a damp dish towel and let rise again for about 20 – 30 minutes.
prepare topping: in a small or medium saucepan heat the butter, sugar, honey, cream and salt over medium heat until the butter and sugar have melted. bring to a simmer and cook it for 3 to 5 minutes until the mixture becomes a shade darker (it should go from a yellowish tone to a light beige), stirring frequently. stir in the almonds. set aside to cool down. spread the topping over the dough. bake on center rack for about 25-30 minutes until crust is a bronze color and inserted toothpick comes out clean.
make the pastry cream: warm milk and vanilla in a medium saucepan over medium heat. pour mixture into a small bowl or cup, ideally with a spout and set aside. in a saucepan, whisk egg yolks and sugar vigorously together for a minute, until pale and ribbony. whisk in cornstarch and salt until smooth. slowly drizzle in warm milk mixture into egg mixture, keep whisking. once you’ve added half of the milk, add the rest in a more steady stream, again continuously whisking. return the saucepan to the stove and heat up on medium-high heat until it bubbles, then simmer for one to two minutes, while whisking to keep it from burning. take off the heat, whisk in butter and vanilla. let custard cool down completely before using, speed up process by covereing it with plastic wrap and putting it into the fridge or whisking it over a bowl of ice water.
assemble the cake: once both the cake and pastry cream are fully cooled, divide cake horizontally into two layers with a serrated knife. spread the pastry cream over bottom half and place the second half on top. Serve in rectangles or squares.
wrapped in a tea towel, bee sting cake will keep in the fridge for up to two days.
nikki+++
16. March 2020 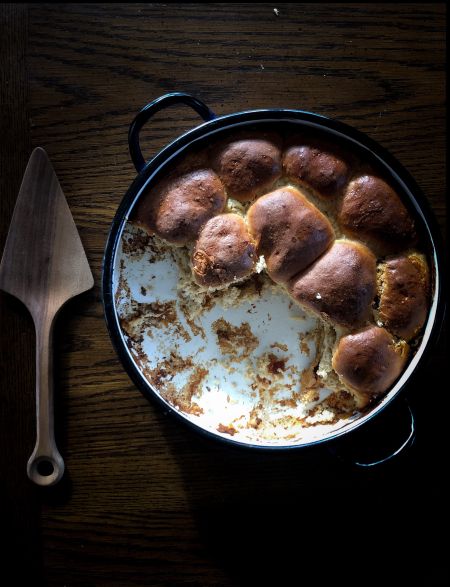
one of my favorite food memory from childhood are meatless friday lunches. growing up in Bavaria meant that on a friday it was either fish or a sweet, dessert like dish for lunch. “mehlspeise” as it was called, roughly translates to “flour dish”. these would be pancakes, or the scrambled version of them called “emperor’s mess or” also know as “kaiserschmarrn”, as well as less known recipes from wheat grits, left over rolls, or rice pudding, all of them usually served with preserved fruits or apple sauce and a healthy dash of cinnamon and sugar.
the one dish that stood out among all the delicious treats were yeast rolls, the bavarian version of them baked in milk and filled with preserved plums. my mother truly abhorred making yeast dough for reasons that were beyond my understanding at the time. i only knew that she would regularly turn to the most interesting vocabulary describing her frustration over the dough not rising appropriately yet one more time, although she had gone through all the steps and stages of mixing and proofing meticulously, and still there was a brick baking in the oven. this went on until that night she got invited to one of these events that started to pop up all over Munich in the late 70s: a tupperware party!
that day, when she unwrapped the delivery of her orders she had put in at the event, changed her and our life forever. she was know the proud owner of a yeast dough prepping set, complete with a big mixing bowl and lid, and some kind of shaker device with a wheel like insert to mix sugar, yeast and milk. the set came with detailed step-by-step instructions on how to mix all the ingredients in order to achieve the desired result of a well proofed and airy yeast dough. And miraculously it worked! From this moment on, my mother would make all these no-fuss yeast doughs for quick breads, pizza, and also the much favored yeast rolls.
To this day she will insist that nothing else works for the perfect dough but her bespoke tupperware yeast dough set. The result was, that for the longest time I also was convinced that a perfect yeast dough was impossible to achieve any other way. Well, let”s say somewhere down the line I learned it differently. Let me tell you that a yeast dough is 1) the quickest and easiest dough to prepare, and 2) the dough that loves to be stored for a while when made ahead. It actually improves with time.
recipe for bavarian yeast rolls for a 25×30 cm baking dish
ingredients for dough:
500g unbleached flour
20g fresh yeast or one package of dry yeast
250 ml warm milk
75g cane sugar
½ tsp salt
1 tsp vanilla extract
80g butter, melted
1 egg
ingredients for filling:
about half a pound fresh or frozen pitted cherries, preserved cherries, preserved or fresh plums, apricots, or nothing.
extras:
50 g butter, for baking
1 cup of milk for baking
50g of sugar mixed with a tsp of cinnamon for sprinkling
directions:
prepare the dough:
warm up the milk in a small pot until it starts steaming, let cool down to about 110°F or until warm to the touch. add a table spoon of sugar and the yeast. stir until sugar and yeast are resolved and let the mixture sit for about ten minutes until bubbly. pour flour into a large bowl, make a well in the center, add egg, sugar, vanilla extract and salt. pour yeast mixture into the flour mixture. With the kneading hook of a stand or hand held mixer knead the dough for about five minutes until it comes off the sides of the bowl forming a ball. put the dough into an oiled bowl, and cover tightly with a lid or plastic wrap. in a draft free place, let the dough proof for about one hour at room temperature until it has doubled in size.
shape rolls:
with a table spoon, cut off pieces a little larger than golf ball size. on a floured surface or cutting board press them into a round shape. Set three to four cherries, or a teaspoon of preserve onto the dough, fold the dough around the filling, pinching the seams close, rolling them into a ball adding tension to the surface. set 25×30 cm baking dish on the stove, add 100 g of butter, melt on medium heat, place the rolls in rows on melted butter, cover baking dish with a tea towel and let the rolls rest for about 30 minutes.
bake rolls:
preheat the oven to 375°F. warm up the extra milk with sugar & cinnamon, pour over rolls, bake the rolls for about 45 minutes until golden brown. let them cool down in the pan, then turn them over onto a cutting board or serving platter.
eat them while still warm.
nikki+++
19. February 2019
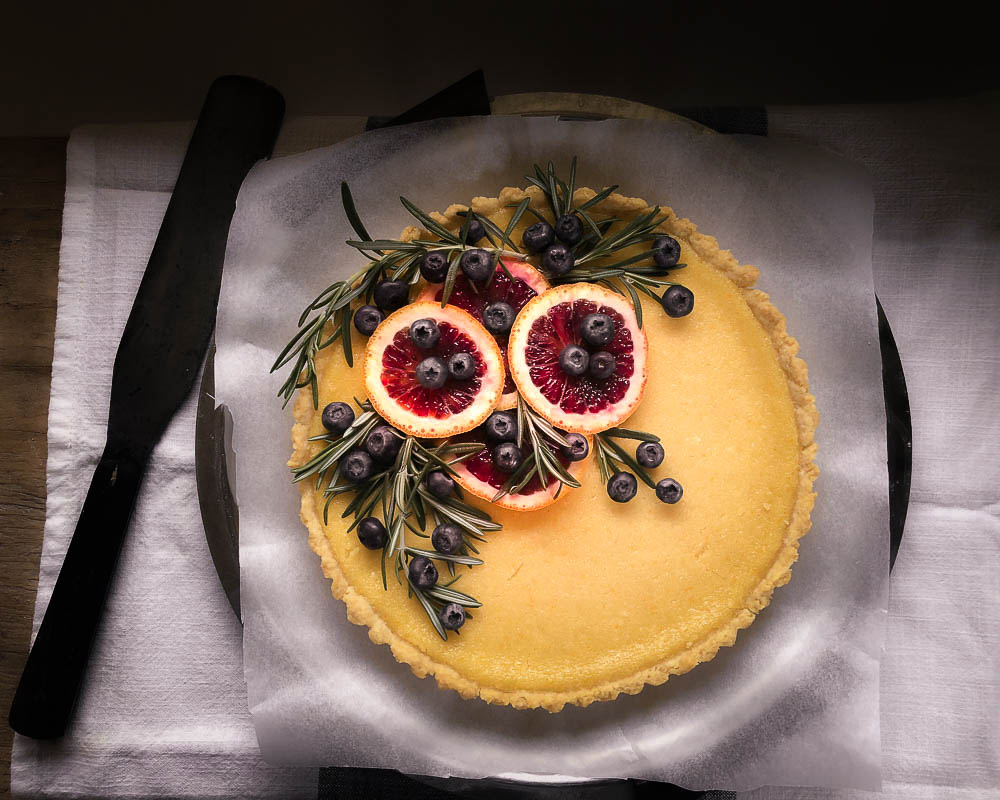
smitten with the abundance of citrus varieties during the winter months, i always hang on to pastries and desserts incorporating them as long as i can. i love the citruses’ wild scent and untamed taste, never overpowering but ever so distinct. pairing the sweet and soothing orange flavors with the wild aroma of the rosemary is a combination particularly close to my dessert lover’s heart. ever since i have fallen in love with rosemary shortbread and the orange version of a curd, i have envisioned to combine them in fine pastry. only recently was i self-confident enough to give it a try: a sweet tart crust infused with the mediterranean herb, filled with sweet and creamy orange curd, perfect combo for chilly late winter days.
rosemary and orange curd tart
ingredients for the crust:
190 g all-purpose flour (1,5 cups)
a pinch of salt
170 g butter (1,5 sticks)
2 tbsp rosemary needles, chopped
30 ml cold water (1/8 cup)
ingredients for the orange curd:
juice of one lemon and 1,5 oranges, about 80 ml total (1/3 cup)
2 tbsp of orange zest
150 g sugar (3/4 cup)
4 eggs
pinch of salt
115 g butter, cubed (1 stick)
make the crust:
in a small saucepan melt the butter and add the chopped rosemary needles. bring butter to a boil, take off the heat and let cool down for about 20 minutes. strain butter and discard the rosemary needles. chill the butter in the refrigerator until it settles.
in a large bowl, mix dry ingredients. add chilled butter and with your fingertips work the mixture into coarse crumbs. add some water and work the dough until it comes together. between two sheets of wax paper or plastic wrap, form dough into a disk and roll to the size of a 9 inch tart pan. chill in refrigerator for 30 minutes.
make the curd:
in a small sauce pan, whisk together the orange and the lemon juices, the orange zest, sugar, salt, and the eggs. slowly heat the mixture over medium heat while continuing to whisk for about 12 to 15 minutes. Once mixture thickens, remove from heat and stir in the butter cubes. keep stirring until the butter is fully incorporated. set aside to cool.
bake the crust:
preheat oven to 350 F or 180 C. butter and flour a 9 inch (23 cm) tart pan with a removable bottom or a spring pan.
take the crust from the refrigerator and let it soften at room temperature. you can speed up the process by slightly smoothing the crust with your hands. roll out the softened crust to the size of the baking pan. remove wax paper or plastic wrap an press dough into the baking pan. pull the dough up to form a rim about an inch (2,5 cm) high. bake about 15 minutes until the edges turn golden brown. cool down on a cooling rack.
bake the tart:
reduce the heat of the oven to 320 F (160 C). pour the orange curd into the tart crust and bake for another 15 to 20 minutes until the curd is set completely. if the orange curd is still wobbly, add another 5 to 10 minutes to the baking time.
cool the tart on a cooling rack, remove from the form and decorate with blood orange slices. keep in the refrigerator for up to two days.
inspiration and guidance for the crust came from the Cook’s Atelier’s simple but effective pate sucree recipe and the orange curd is based on Sarah C. Owen’s lemon curd recipe in Sourdough.
not ready to let go of citrus yet!
nikki+++
3. February 2019 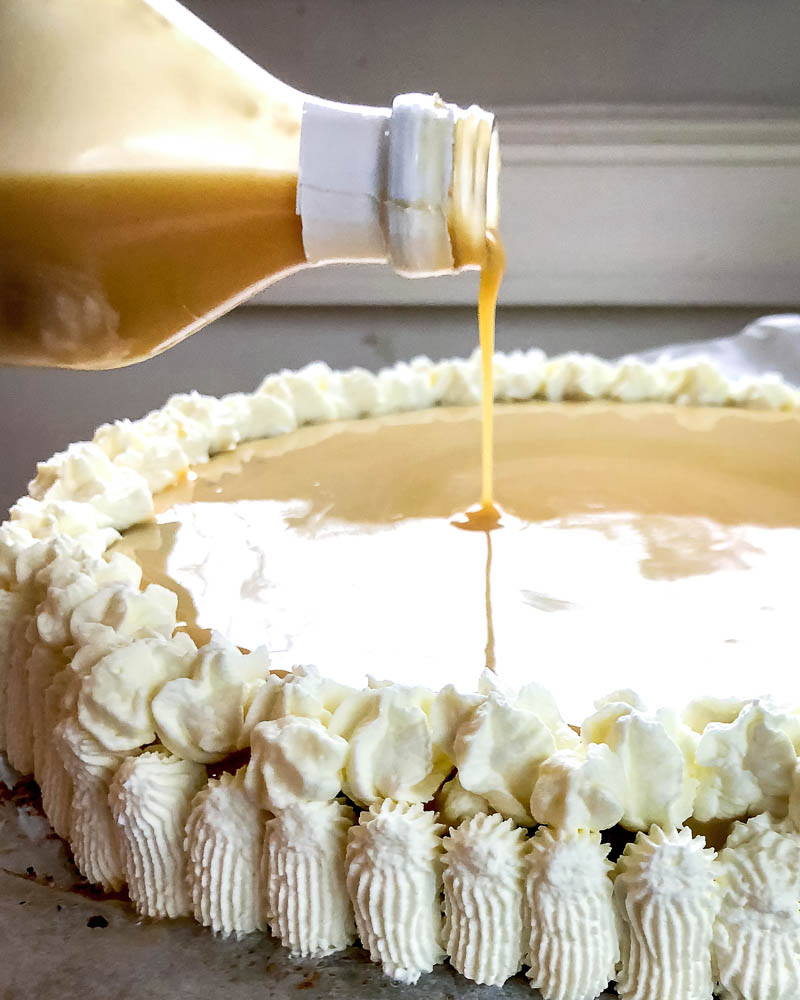
spiking pastries or rather the fillings thereof is certainly at the heart of German pastry baking: just think about the Kirsch, so famously giving the Black Forest Cake its prime aroma, the raisins for stollen soaking in rum at least a day or two, the ambrosial red wine and glühwein coffee cakes, and the huge variety of chocolates filled with high percentage spirits distilled from summer fruits such as apricot, pear and plum.
being the laid back people Germans are when it comes to alcoholic beverages as part of family rituals throughout the seasonal year, nobody was overly concerned when my grandparents gave their grandchildren an elegant box of luscious chocolates filled with spirit infused fillings for Christmas back in the days. those were the times, when the spiked eggnog tarte was a staple at my mother’s winter coffee hours. her dark chocolate tarte was immensely popular with everyone, not only for its spirited character, but also because of its elegant appearance, wrapped in delicate laces of piped whipping cream and covered with shimmering ‘eierlikör’!
But times changed, even in Germany, and serving a cake covered in a layer of high percentage alcohol at a table crowded with children and teenagers became a thing of the past. Only recently, when i discovered that stateside eggnog is primarily a non-alcoholic treat and only second an alcohol infused libation, i was reminded of the recipe again. Certainly, eggnog isn’t exactly ‘eierlikör’, however it can can very well be substituted for it in this recipe. in case the alcohol infused version does appeal to you, spike the eggnog with some rum to taste.
here is my mother’s secret recipe for the vintage eggnog tarte revealed:
ingredients for the tarte:
80 g butter
80 g sugar
1 tsp vanilla extract
5 eggs, separated
200 g ground almonds
100 g dark chocolate, grated
ingredients for the topping:
500 ml of whipping cream
eggnog
directions:
line a spring form with parchment paper and pre-heat oven to 350 F.
in the bowl of a stand mixer, whip the egg whites until stiff white peaks are forming. move the egg whites into a different bowl. put bitter and sugar into the mixing bowl and with the paddle attachment beat until creamy, add the egg yolks, one at a time and keep on beating into a white and creamy mixture. add the chocolate and stir until incorporated. with a wooden spoon or a spatula gently fold the egg whites and almonds under the butter and egg yolk mixture. don’t over mix.
spread batter evenly into the spring form and bake for about 55 – 60 minutes. Let cool entirely on a cooling rack.
with the whisk of a stand mixer, whip up the heavy whipping cream. fill it in a pastry piping bag with a fluted tip.
with a wooden pick, poke holes into the tart and brush it with eggnog to soak the tarte. pipe whipping cream around the edge of the tarte and along the sides. pour more eggnog onto the tarte, don’t overflow. Chill the tarte in the refrigerator until serving.
For the weeks until spring, keep warm and bake on!
nikki+++
22. June 2018 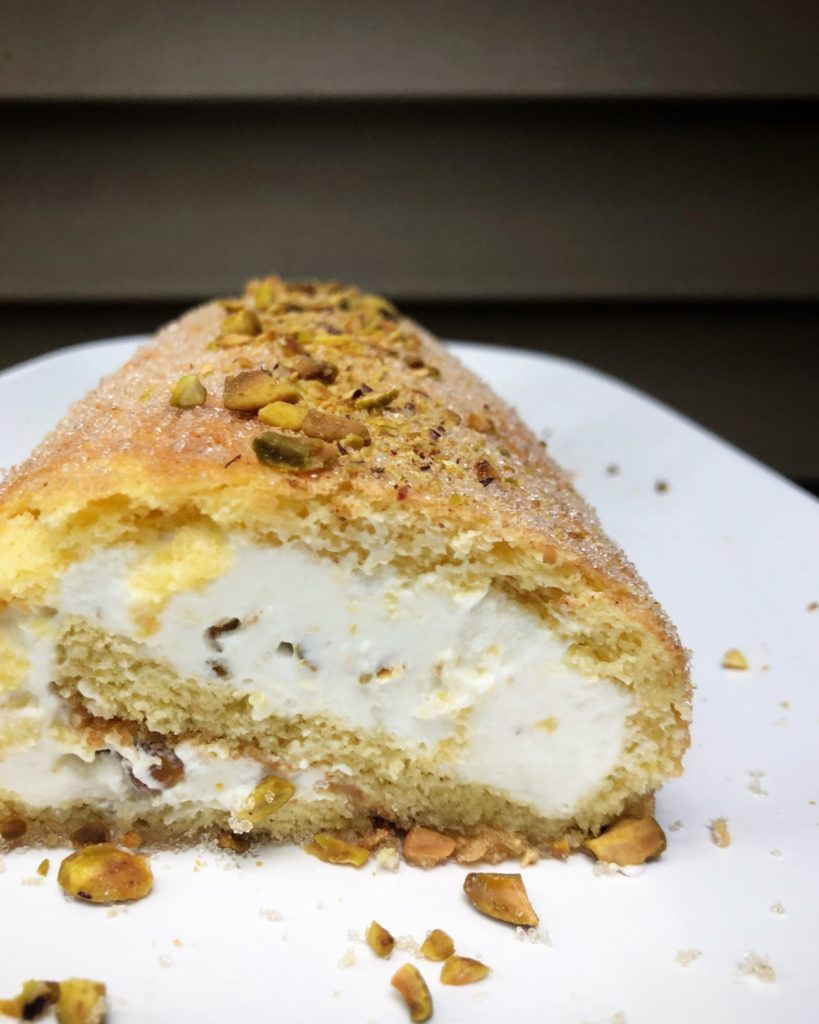
this year, i have managed to produce a very decent cordial from elderflowers. i found the elderberry bushes tucked away in the woods behind my house. three shrubs, growing inconspicuously as part of a patch of underbrush. when i discovered them last year, i felt elated at the chance to continue this beloved early summer routine in my new home. in that same month, always more the visionary than the practical gardener, i also planted an elderberry sapling at the corner of the backyard that i had bought from the native plant society. the tiny bush grew extensively this spring, more than tripling in size, but blossoming might take another year.
with bottles full of sweetly scented syrup filling up the fridge, i decided to finally give this recipe a try. intrigued by its decidedly sophisticated combination of flavors, it had hovered in the back of my head for quite a while. at the same time, i tested millet flour in some of my sourdough breads and i was smitten by the tender crumb and the attractive yellow color it added to the baked goods.
the elderflour cordial infused cream roll will definitely spiral you into culinary summertime. the fine texture of the millet flour adds a sunny tone to the soft and airy sponge cake, flavoring it with a distinct nutty note. before filling the roll, soak the sponge with some of the cordial, adding more scented and juicy moisture to the fine, graceful taste of the yogurt and cream filling.
cream roll with millet flour
ingredients for the sponge cake:
4 eggs, separated
a pinch of salt
25 g confectionery/powdered sugar
75 g granulated sugar
½ tsp vanilla extract
75 g millet flour
½ baking powder
tea towel and some granulated sugar (3-4 tablespoons for rolling up the cakes base)
ingredients for the filling:
200 g whole milk greek yogurt
50 g granulated sugar
1/2 envelope gelatin
200 g whipping cream
about 100 ml of elderberry cordial
two handful of chopped pistachios
directions:
cover baking sheet (ca. 9×14 inches, 24×40 cm) with parchment paper and preheat oven to 375°f.
with the whisk of an electric handheld mixer or a stand mixer beat egg whites until soft peaks form. add a pinch of salt and the confectionery sugar and beat until stiff and glossy. in another bowl beat egg yolks and granulated sugar until white and creamy. add vanilla extract. spoon egg whites over the egg yolk mixture, sift in millet flour and baking powder fold into batter with a spatula. do not over mix, you still want to see some lumps of egg whites and some of the flour.
pour batter onto baking sheet and spread out evenly. bake for about 10 – 12 minutes until golden brown. sprinkle a tea towel with granulated sugar. turn baked dough upside down onto the tea towel. gently pull off the parchment paper. starting at the long side and using the towel for support, gently roll cake base into a log.
while dough is cooling, prepare the filling. stir sugar into yogurt. Following the directions on the package, soak gelatin in two or three tablespoons of elderflower syrup. In a small sauce pan, gently heat up the soaked gelatin, adding another two or three table spoons of elderflower cordial. Once the gelatin is entirely dissolved, stir in two or three tablespoons of the yogurt-sugar mix to keep the gelatin from forming lumps. pour gelatin mix into yogurt-sugar mix and stir well. refrigerate yogurt gelatin mix. once it starts to settle, whip up 200 g of whipping cream until soft peaks form. to avoid lumps, whip up yogurt gelatin mix before adding the cream. fold cream gently into yogurt until incorporated, chill filling in the refrigerator.
carefully unroll the cool dough with the tea towel. sprinkle sponge cake with some more of the elderflower syrup, spread cream mixture onto dough. sprinkle filling with the chopped pistachios. save some for decoration. with the help of the tea towel, roll sponge cake and filling into a log. with the seam on the bottom, carefully transfer roll onto a serving platter, sprinkle with confectionery sugar and decorate to your liking. chill in the refrigerator until serving.
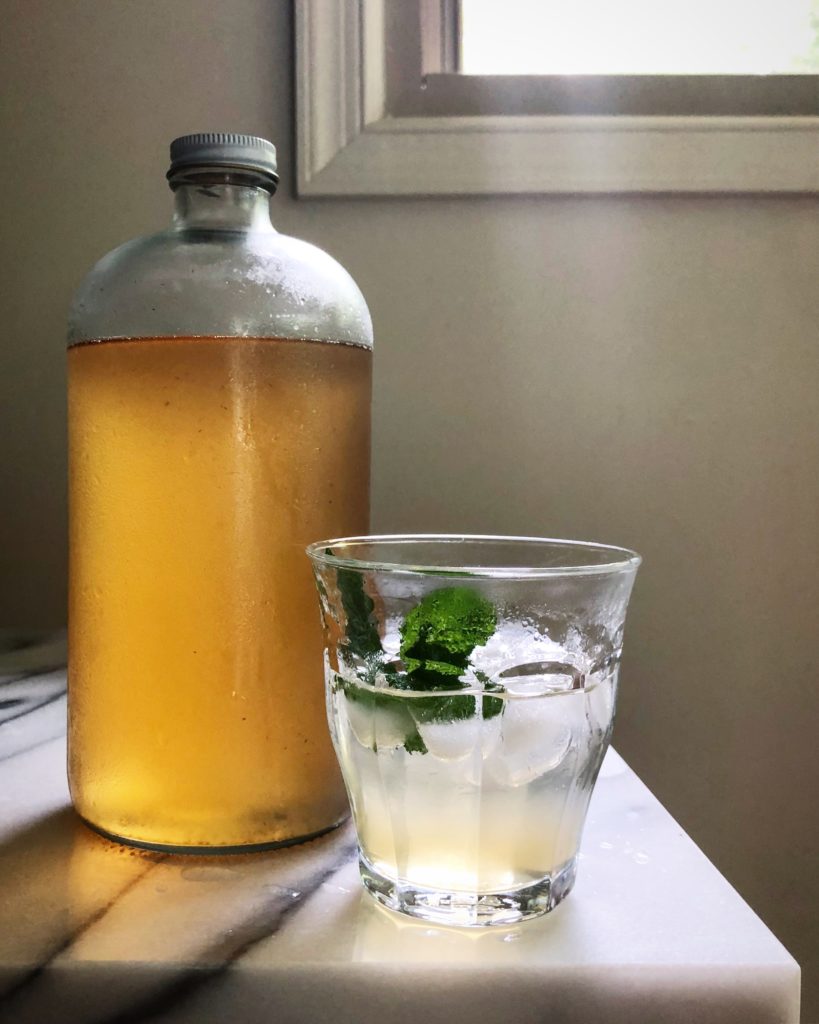
here, the backyard sparkles with fire flies dancing in the blue hours of the dusk. sipping elderflower cordial on ice, infused with fresh mint from the side of the house, i am watching the fan lazily stirring the warm summer air. from where i sit, i can see the top leaves of the elderberry bush shimmering in the dim light. next year, i am thinking, ever the hopeful visionary, next year, it will be the time to harvest our first homegrown elderflowers.
nikki+++
21. May 2018 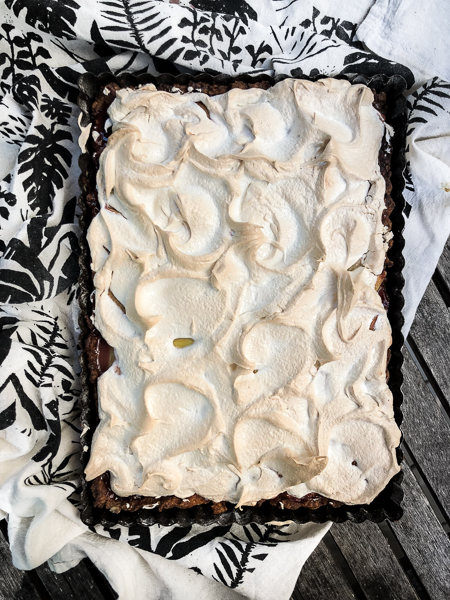
it’s the season now! it’s the time of bright fresh green in the yard, of vibrant florals dotting the flower garden, and of delicate little spikes working themselves upwards to the sun through the dark and moist soil in the vegetable patch. stubbornly bavarian in heart and mind, at times striving for independence against all odds, i am still triyng to grow the greens, legumes, and berries of my native home, more or less successfully in virginia, since it is for some much to hot and humid here in the summer. peas, radishes, gooseberries and red currants, even the rhubarb i favor so much, seem to prefer cooler temperatures and chilly nights under cloudy skies. one might want to debate the advantage of having summer days from may till beginning of october over the cool, short bavarian summer, but when it comes to the garden fruits this enternally springlike climate produces, it definitely wins over the alternative. at least until virginia summer abundance kicks in!
for now, i am still in alpine spring mode, with crisp red radish bites and sweet-tart coffee hour treats. for the purpose of making me feel more at home, he who had never tasted rhubarb before we met, lest would even have recognized it if he had come across it, brought home some beautiful, delightfully dark red stalks from the local farmers market. such are the romantic couple’s moments in a home full of teenage dramas and sock-littered floors!
while patiently waiting for the newly acquired plant to produce fine scented stalks in the backyard in springs to come, it seems the farm grown rhubarb was this year’s one and only chance for the uniquly delicious spring treat, plus a great opportunity to finally note down the original german version of the recipe in the english translation.
ingredients for a 9″x 13″ (33 x 23 cm) baking sheet of rhubarb tarte
crust:
125 g flour
100 g chilled butter, in cubes,
25 g fine cane sugar
pich of salt
1/4 tsp baking powder
2 egg yolks
fruit topping:
300 g rhubarb, skinned and cut 1/2 inch pieces
1 tbsp flour
1/4 tsp ground cinnamon
100 g red berry preserve
meringue:
2 egg whites
100 g fine sugar
Preheat oven to 375°F / 180°C and cover baking sheet with parchment paper.
In a large bowl, mix flour, salt, sugar, and baking powder. Add butter in cubes. With your fingertips, quickly work butter into dry ingredients until small crumbs form. with a wooden spoon work in egg yolks until smooth dough forms. Finish with a few quick turns bey hand. Pad dough into a 1 inch disk, wrap with wax paper and chill in refrigerator for at least 30 minutes.
Roll out chilled dough onto the baking sheet lined with parchment paper. With your fingers form a small rim on the edges. With a fork poke several wholes into the dough and bake for 20 minutes. Set aside for 10 minutes to let cool down.
Mix rhubarb cubes with 50 g of berry preserve, add flour and cinnamon. With the wisk attachemnt of a stand mixer or a hand mixer beat egg whites at medieum speed until soft peaks form. Slowly add sugar and keep whisking on high speed until sugar is completely dissolved and mixture is shiny.
With a spoon, spread 50 g of berry preserve on the dough, then add the rhubarb on top. Using a rubber spatula, cover rhubarb with meringue, gently forming peaks and valleys as you go along.
Bake for another 20 minutes until meringue peaks start to trun golden brown. Reduce heat to 140°F/60°C, crack oven door open with a wooden spoon, and dry out meringue for another 15 minutes.
Serve while still warm and the meringue still crunchy. To keep, cover loosely with a dish cloth and store for another day at room temperature. Don’t be surprised when the base and the meringue might get a little soft. This will make for a very juicy, deliciously tart pastry delight! On very hot summer days refrigeration might be advisable.
nikki+++
14. February 2018 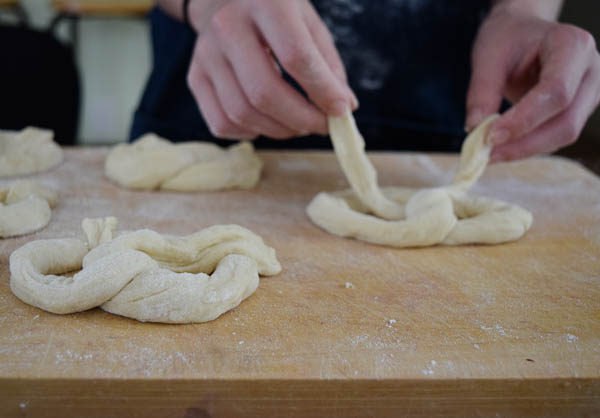
in bavaria, there is no real need for homemade pretzels. almost any pretzel you buy is superior to anything you will produce at home, especially when it comes to the crisp, salty, honey colored and distinctly sweet scented crust.
however, living on the other side of the ocean, this is a totally different challenge. for the longest time i have been searching for the secret of making soft pretzels from scratch that taste like the pretzels from the corner bakeries of my hometown. nothing i bought here from the european-style bakeries came close to what i remembered. there are few things my alpine heart is missing on this side of the ocean, the delicious saltine sweet and savory twist being one of them. hence the need for a soft pretzel exploration in my home kitchen.
crucial to the process is the lye solution, a caustic alcaline solution that cannot be found at your regular grocery store. in addition to it’s limited availability it is also very acidic and should only be handled with protective gear, not something you would want to do in your home kitchen. a baking soda bath turns out to be the alternative.
soft pretzels:
much testing was involved to come up with the mix i am sharing below, the judges of my efforts being incorruptible authorities on the twisted delicacy from early childhood onward, for bavarian toddlers are weaned on pretzels.
for the pretzel dough: 600 g unbleached wheat flour, 50 g packed dark-brown sugar, 375 ml warm water (about 110 degrees), 1 package dried yeast, 10 g salt, vegetable-oil cooking spray
for the soda bath serving as lye:
1 liter of water, 50 g baking soda, 100 ml pale ale-style beer, 1 tbsp brown sugar, coarse salt,
sprinkle with:
poppy seeds, sunflower seeds, pumpkin seeds, caraway seeds, sesame seeds (optional)
in a medium bowl, mix together warm water, yeast, and brown sugar; let stand until foamy, 5 to 10 minutes.
in the bowl of an electric mixer, combine flour and salt using your hands. add yeast mixture and, still using your hands or a wooden spoon, combine until a shaggy dough is formed and water is absorbed.
using the dough-hook attachment, mix dough on medium-low speed until tight, elastic, and smooth. spray a large bowl with vegetable oil, set dough into bowl, cover tightly with a lid or plastic wrap. let dough rise at room temperature for about one hour.
preheat oven to 430°F/225°C, with rack in upper third. lightly coat a baking sheet with cooking spray or cover with parchment paper.
shape dough into a log. cut dough into about eight pieces, each about 1 inch wide. working with one piece at a time, roll dough into long strip and form into pretzel shape. if you have difficulty shaping the pretzels, form rolls, they taste just as good.
in a wide pot, combine water, baking soda, beer, and brown sugar. bring to a simmer over medium-high. simmer pretzels, one at a time, about 30 seconds each, holding them under surface of water, if necessary, with a wide slotted spoon or spatula transfer to prepared baking sheet.
sprinkle pretzels with pretzel salt and/or desired toppings, using one topping or combining different ones. transfer to oven and bake 20 – 25 minutes until crust is golden. transfer pretzels to a wire rack to cool.
thoughts!?!
nikki+++
8. July 2017 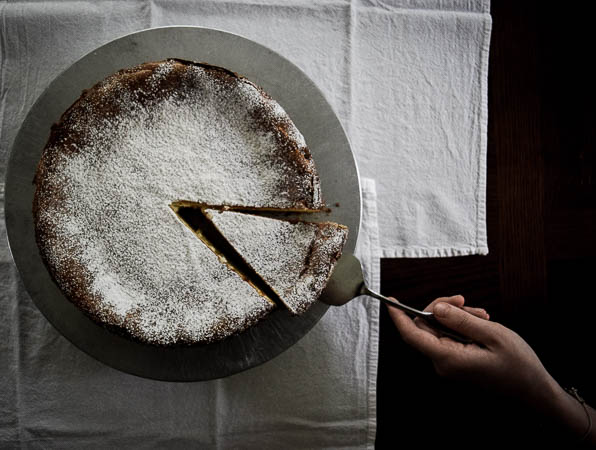
earlier this year, I started sharing wisdom. i pulled out the cookbook my mother had given me when i left my original home. it is the most seasoned of my travel companions, not only in appearance, but also my closet one with many of the recipes telling stories of my journey through life. it talks about a favorite lentil stew that would calm me down after a rough day. it recalls moments of making new friends over a sweet scented apricot streusel cake. it harbors cherished memories of the still very tiny little miss and herr erfinder devouring ‘griesnockerl’, the bavarian version of matzo balls. it preserves favorite lunchtime eats of doughy pancakes, the southern german equivalent of the french crepes. and, it also is my most valuable directory to the art of german pastry baking.
during the past winter, i had started to plan a few classes in crochet and embroidery, intending to bring back a rythm of meaningful occupation after the move. they were to be taught at the adult and community education program here. little did i know that instead of exploring the realm of fiber arts i would end up sharing wisdom about the german tradition of ‘kaffeeklatsch’. the odds and ends life leaves us hanging with for the longest time, often come to full circle at moments we are least expecting it. it seems i had to cross an ocean to be able to share what i know best: baking pastry in a spring pan.
since, i have connected with many lovely people over mastering the art of short crust and yeast dough. most delightful are the exchanges across cultures and traditions. with all the differences in background and experiences we are bringing to the table, there is a distinct comfort in the shared delight of a fine piece of pastry made from scratch. no matter where we originally came from, universal is the experience of preserving culinary memories of the past we left behind and adapting them to the new environment we find ourselves in.
adapted as well is the recipe below from the one i found here. it hits the mark in the best possible way when baking a german cheesecake in ‘quark’ diaspora. it also relieves me of the stress of having to scout for the rare and usually most expensive occasion to find quark on the shelves of a grocery store far away from my usually hunts. for a taste of summer, drop a handful of blueberries or raspberries on the crust before you spread the filling on top.
for the crust: 150 g unbleached, all purpose pastry flour, substitute with whole wheat flour for a more nutty flavor, 1 tsp baking powder, 50 g cane sugar, 1 tsp vanilla extract, a pinch of salt, 1 egg, 75 g butter
for the filling: 750 g cream cheese, 100 g cane sugar, 1 (organic) lemon, zest grated and juice, 4 eggs, separated,
powdered sugar for dusting
butter and flour spring pan. Attach paddle to stand mixer or mix by hand in a large bowl: combine flour, baking powder, sugar, vanilla, salt, egg and butter in cubes into a smooth dough. roll out 2/3 of the dough at the size of the spring form between two sheets of wax paper. line the bottom of the form with the dough. use leftover dough to press into a rim along the sides of the spring form. chill crust for about 30 minutes.
preheat oven to 400°F/200°C. bake pie crust for ten minutes. take out pie crust, set aside to cool and reduce heat to 350°F/175°C.
for the filling beat the egg whites with whisk attachment until stiff peaks form. move egg whites into a different bowl. In the bowl of the mixer whisk cream cheese, egg yolks, sugar, lemon zest and lemon juice into a smooth cream. fold in the egg whites. spread filling evenly onto crust, bake cake for another 60 – 70 minutes until golden brown and knife or toothpick comes out clean. turn off the heat, crack the oven door and let cake cool down inside the oven. dust with powdered sugar. eat while still warm or refrigerate to keep for another two days.
nikki+++
|
meet nikki bavarian, living in virginia, homebaker and pastrylover with a passion for things made from scratch.
|